Managed Metadata Service in SharePoint 2010
Taxonomy Definition:
The exact definition of taxonomy varies slightly from source to source, but the core of the discipline remains: the conception, naming, and classification of organism groups. As points of reference, three recent textbook definitions are presented below:
- Theory and practice of grouping individuals into species, arranging species into larger groups, and giving those groups names, thus producing a classification;[2]
- A field of science (and major component of systematics) that encompasses description, identification, nomenclature, and classification;[3]
- The science of classification, in biology the arrangement of organisms into a classification.[5]
Managed metadata service application allows us to formalize our Taxonomy or metadata which will be utilized across the entire farm.
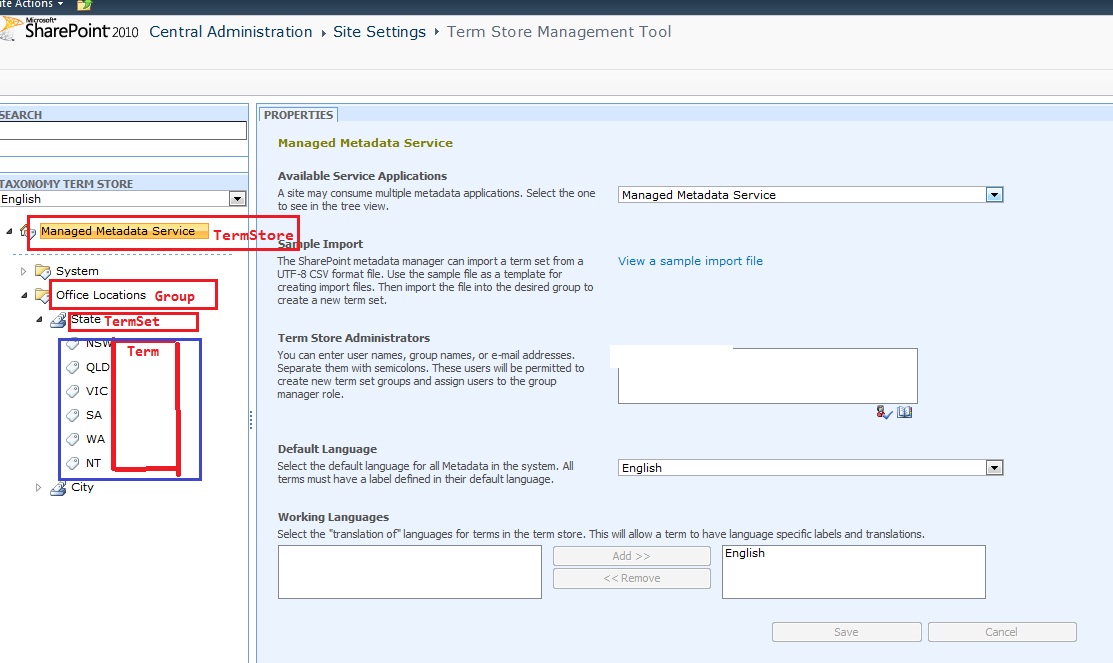
Term Store This is the database in which our managed metadata is stored in.
Term is a word or a phrase that can be associated with an item in SharePoint Server 2010.
Term set is a collection of related terms.
There are two types of Terms available within SharePoint 2010. These are “Managed Terms” and “Enterprise Keywords”.
Managed terms, commonly referred to as “Taxonomy” are predefined words or phrases that can only be created by users with the appropriate permissions. We can refer to this special group of users as “Metadata Content Managers”.
Enterprise keywords, commonly referred to as “Folksonomy” are words or phrases that have been added by the end user.
A folksonomy is a system of classification derived from the practice and method of collaboratively creating and managing tags to annotate and categorize content;[1][2] this practice is also known as collaborative tagging,[3] social classification, social indexing, and social tagging. Folksonomy, a term coined by Thomas Vander Wal, is a portmanteau of folk and taxonomy.
Setup the Managed Metadata Service
To setup our Managed Metadata Service, navigate to Central Administration / Application Management / Manage Service Applications.
Click New and select “Managed Metadata Service”
Enter the follow details;
Name: Managed Metadata Service
Database Server: <server_name>
Database Name: Managed Metadata DB
I will utilize the sp_farm account for the Application Pool Identity.
Click Create.
Lastly, navigate to Central Administration / System Settings / Manage services on server and start the Managed Metadata Web Service.
Now that we have successfully setup our Managed Metadata Service, let’s venture into the Term Store Management Tool. You can do so by navigating to Central Administration / Manage Service Applications and clicking on the newly created Managed Metadata Service.
Note, You can achieve the same by highlighting the service application and clicking on the Manage icon located in the ribbon.
This will launch the below screen which is referred to as the Term Store Management Tool.
Available Service Applications: If the farm has been setup with multiple Managed Metadata service applications you can easily navigate and configure each one from the single interface.
Sample Import: Here, Microsoft is providing your designated Metadata Managers with a template import file. This template can be used as a base of creating your own which can then be later imported.
Term Store Administrators: This is where you would add the designated users which will provide them with the ability to create new term set groups. By doing so, they will in turn be able to provide the necessary permissions to the group manager role. Note, users added here have full control of the specified term store. In the above screen capture, I have gone ahead and added Administrator and myself as Term Store Administrators.
Default Language: This one is self-explanatory
Working Languages: In addition to the Default Language, you can also specify additional languages available for translation purposes.
Creating Groups, Term Sets and Terms utilizing the Term Store Management Tool
Navigate to Central Administration / Application Management / Manage Service Applications. Highlight the Managed Metadata Service and click on Manage.
Let’s begin by creating a new group. You can do so by clicking on the Management Metadata Service node (or whatever you called it) and selecting New Group.
In my example I will create a group labeled “Office Locations”. I have entered a description to help others identify the purpose of this group and added the Group Managers and Contributors, so what’s the difference between the two levels of permissions?
Group Managers have the privilege to add items to the group and also have the ability to add users to the Contributors group.
Contributors have the privilege to only add and edit terms and set term hierarchies within the group.
After adding the above details, click on Save.
Our new Group will now be listed as per the below.
Will now create 2 Term Sets which will sit under “Office Locations”. They will be, “State” and “City”.
You can do so by clicking on the Group Name and selecting New Term Set.
I will label my first Term Set as “State”.
Here I will identify the owner of this Term set, optionally specify an email address for “term suggestion” and list the Stakeholders who are notified before major changes are made to the term set.
We can also set the Submission Policy which dictates whether we allow users to contribute to the Term Set (commonly referred to folksonomy) or restrict it to only metadata managers (Taxonomy).
Our last option determines whether we will allow our end users to utilise the term set for tagging.
Once you have specified your options, click Save. I will now proceed to create a second Term Set labeled City as per the above instructions. Once finalised, our Term Sets will be listed under our Group as per the below screen capture.
I will now proceed to create our Terms below our Term Sets. I’ll begin by selecting the first Term Set “State” and then selecting Create Term.
I will create my first Term, “NSW” which is an Australian State. You will then be greeted with the below screen;
Here we can specify whether the Term is available for Tagging, add a Description to assist users and add “Other Labels” in which we can enter synonyms and abbreviations relating to the Term. This might come in handy when adding Terms and in my example, I have added “New South Wales” as an additional Label to the abbreviated “NSW” Term.
Click Save once you have completed the modifications. I will proceed to create a Term for each State and City following the above steps and you should have something similar to the below once you have finished.
Note, we can expedite the creation of Term Sets by using the Import method
As an example, I have utilised the sample Import File provided by Microsoft and imported the contents within our Managed Metadata Service.
Now that we have a thorough understanding of the creation of Groups, Term Sets and Terms
Managed Metadata’s primary purpose is to provide you with a central location to store your metadata that can be later utilised in ANY SharePoint site
Adding Managed Metadata to a SharePoint List or Library
Let’s navigate to a List in which we would like to add our Managed Metadata as a column. Navigate to the List or Library in question and click on List under List Tools in the Ribbon and then click on Create Column.
Enter a name for your Column. In my example I will call it State as I will be using the State Term Set which we created and select Managed Metadata as your column type.
Set your “Display format” so it either displays just the term label or the entire path.
Under Term Set Settings, select your Term Set. You can also utilise the search facility in the event you have a large number of Term Sets.
Finally select whether you want to Allow Fill-in, which is only available if your Term Set was set to allow it. This is handled by the Submission Policy set to Open
Click OK once done.
I will now proceed to add a new item in my fairly bland Custom List via Add new item.
You have the option to click on the browse button on the right or you can begin typing in which it will provide you with Suggestions.
So what is the difference b/w Managed Metadata and content type.
Content type is more specific to Schema of List or library.
Managed Metadata is more about Data in the list.
-------------------------------------------------
Now i have created taxonomy data in Managed Meta data. i have a list with "Managed Metadata" data type.
- Term Store Management Tool
GO to List add new item, you can see state name in the state column.
How to add this state column data using Object model code...
using System;
using System.Collections.Generic;
using System.Linq;
using System.Text;
using Microsoft.SharePoint;
using Microsoft.SharePoint.Taxonomy;
using System.Collections.Generic;
using System.Linq;
using System.Text;
using Microsoft.SharePoint;
using Microsoft.SharePoint.Taxonomy;
namespace ConsTaxonomy
{
class Program
{
static void Main(string[] args)
{
using (SPSite site = new SPSite("http://SP2010"))
{
using (SPWeb web = site.OpenWeb())
{
TaxonomySession taxonomySession = new TaxonomySession(site);
TermStore termStore = taxonomySession.TermStores["Managed Metadata Service"];
Group group = termStore.Groups["Office Locations"];
TermSet termSet = group.TermSets["State"];
Term term = termSet.Terms["NSW"];
SPList list = web.Lists.TryGetList("MyReadOnly");
if (list != null)
{
TaxonomyField taxonomyField = list.Fields["MyTaxonomyField"] as TaxonomyField;
TaxonomyFieldValue taxonomyFieldValue = new TaxonomyFieldValue(taxonomyField);
taxonomyFieldValue.TermGuid = term.Id.ToString();
taxonomyFieldValue.Label = term.Name;
SPListItem item = list.Items.Add();
item["Title"] = "Sample";
item["MyTaxonomyField"] = taxonomyFieldValue;
item.Update();
list.Update();
}
else
{
Console.WriteLine(list.Title + " does not exists in the list");
}
Console.ReadLine();
}
}
}
}
}
{
class Program
{
static void Main(string[] args)
{
using (SPSite site = new SPSite("http://SP2010"))
{
using (SPWeb web = site.OpenWeb())
{
TaxonomySession taxonomySession = new TaxonomySession(site);
TermStore termStore = taxonomySession.TermStores["Managed Metadata Service"];
Group group = termStore.Groups["Office Locations"];
TermSet termSet = group.TermSets["State"];
Term term = termSet.Terms["NSW"];
SPList list = web.Lists.TryGetList("MyReadOnly");
if (list != null)
{
TaxonomyField taxonomyField = list.Fields["MyTaxonomyField"] as TaxonomyField;
TaxonomyFieldValue taxonomyFieldValue = new TaxonomyFieldValue(taxonomyField);
taxonomyFieldValue.TermGuid = term.Id.ToString();
taxonomyFieldValue.Label = term.Name;
SPListItem item = list.Items.Add();
item["Title"] = "Sample";
item["MyTaxonomyField"] = taxonomyFieldValue;
item.Update();
list.Update();
}
else
{
Console.WriteLine(list.Title + " does not exists in the list");
}
Console.ReadLine();
}
}
}
}
}